THE BASICS:Getting Started: - Install nHTTPd and nHTTPd Setup using your favorite package installer.
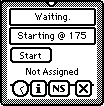
 Establish a TCP/IP connection* with nHHTPd by opening the application and tapping the 'Start' button. The Close box will dis-appear. Establish a TCP/IP connection* with nHHTPd by opening the application and tapping the 'Start' button. The Close box will dis-appear.
*Requires properly configured Newton Internet Enabler - The current IP of your machine will be displayed beneath the Start/Stop buttons. This will be machine name for the URL you will enter in the WWW Client that will access your server.
- When a page is requested, the hit counter will increment.
- After a page is served, the URL path will appear in the monitor window. If there is a HTTP error, that error will show up in this window.
- It is not suggested for beginning users to use any other TCP/IP applications (Eudora, Nethopper, etc) while running this server, as they can corrupt its connection, likely leading to a reset of your Newton device.
- When you ar ready to quit, Tap the 'Stop' button and wait for the connection to terminate.
- The Close Box will re-appear and you can close nHTTPd.
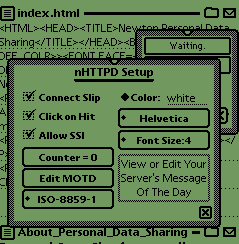
Advanced Topics:The Iconify Button:As much as I have tried to strip down the sizeof nHTTPd, let's face it. It take sup room. On a MP130, it's a veritablehog. So, I added the NS button which hides the active server andcreates an Auxillary button in your background application. When you maximizethe app, the button disappears. If your background application does notsupport Auxillary buttons, nHTTPd will disappear but will still remain active.You may re-show it by tapping on its icon in the Extras drawer. Using nHTTPd SetupUnder the Info Button, you'll find a Prefsslot. Tap it and nHTTPd Setup (if installed) will appear on yourscreen.  Show Slip: This gives you the option toturn on and off the Connect slip that comes up when you Start a nHTTPd connection.By turning the slip off, you automatically select the last connection settingsyou used. Show Slip: This gives you the option toturn on and off the Connect slip that comes up when you Start a nHTTPd connection.By turning the slip off, you automatically select the last connection settingsyou used.
- Hit Sound: Turn this on if you want to hear a tap every time someone acceses your site. It's a fairly benign sound, so I usually leave it on.
- Allow SSI: If you are sure you'll never need them, you can turn off Server Side Includes for a slight speed increase as your server will no longer have to look for them before serving up data. Don't know what Server Side Includes Are? It's covered later. Leave it checked if this is the first time you've set up Personal Data Sharing.
- Reset Counter: Sets your Hit Counter to Zero. Don't do it unless you mean it because there is no warning besides this one that it's irreversible!
- Edit MOTD: You can set a Message of the Day for nHTTPd accessible via a SSI tag. Big time system admins use MOTD's and so can you!
- MIME Character Set: You can choose the character set in which your data is displayed. Selecting "None" will turn this off altogether.
- Color: You can select the background color in which your generated pages are presented. This value is also accessible via a SSI. You may select any of the standard Win VGA colors provided or write in your own HEX code.
HEX Code? Unless it's a named color, browsers need a 6 digit code in hexadecimal to know what color you're talking about.
An example: The green used on this page is "#66CC99" - Font: You may select a default font for your pages. A survey of installed fonts found the ones provided here to be most common. This value is accessible via a SSI tag.
- Font Size: Text is rendered according to a relative scale by most web browsers where SIZE=1 is smallest and SIZE=7 is largest. You may select a default font size for your generated documents using this picker. It is also accesible via a SSI.
- Setup Help: In this window is a hint about what each widget in Setups GUI does. Tap any widget and its function is displayed here :-)
|
 Establish a TCP/IP connection* with nHHTPd by opening the application and tapping the 'Start' button. The Close box will dis-appear.
 Show Slip: This gives you the option toturn on and off the Connect slip that comes up when you Start a nHTTPd connection.By turning the slip off, you automatically select the last connection settingsyou used.